

How To Change Track Color In Pro Tools
Introduction
In this commodity nosotros are going to be looking into the options available inside the Display tab of the Pro Tools preferences.
Pro Tools offers a slap-up range of features and tweaks within its preferences, with enough attention, these piddling changes can become as useful to your mix equally shortcuts. If you're tired of always having to set a zoom depth or change your runway colours, then spend a picayune fourth dimension setting your defaults and as we always say, spend the time mixing and working on your session, rather than wasting information technology on tweaks that could take been set from the get-go.
We will eventually be covering all of the panels inside the preferences dialog window, only for this article, Display options.
Opening and Working With Preferences
Showtime things first, to open up the preferences dialog just navigate to Setup > Preferences every bit shown beneath.
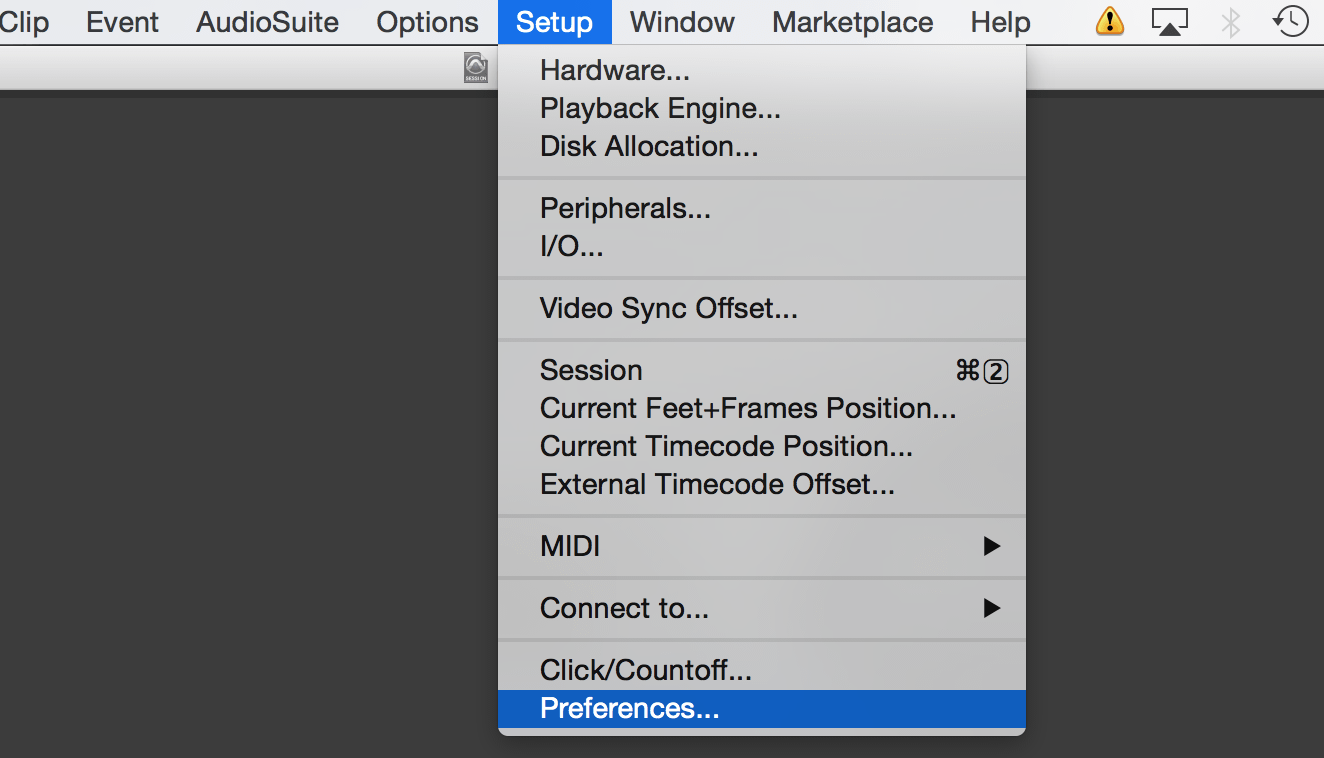
Note: whatever changes and tweaks made in the preferences window will but take issue later clicking 'ok' at the lesser of the window.
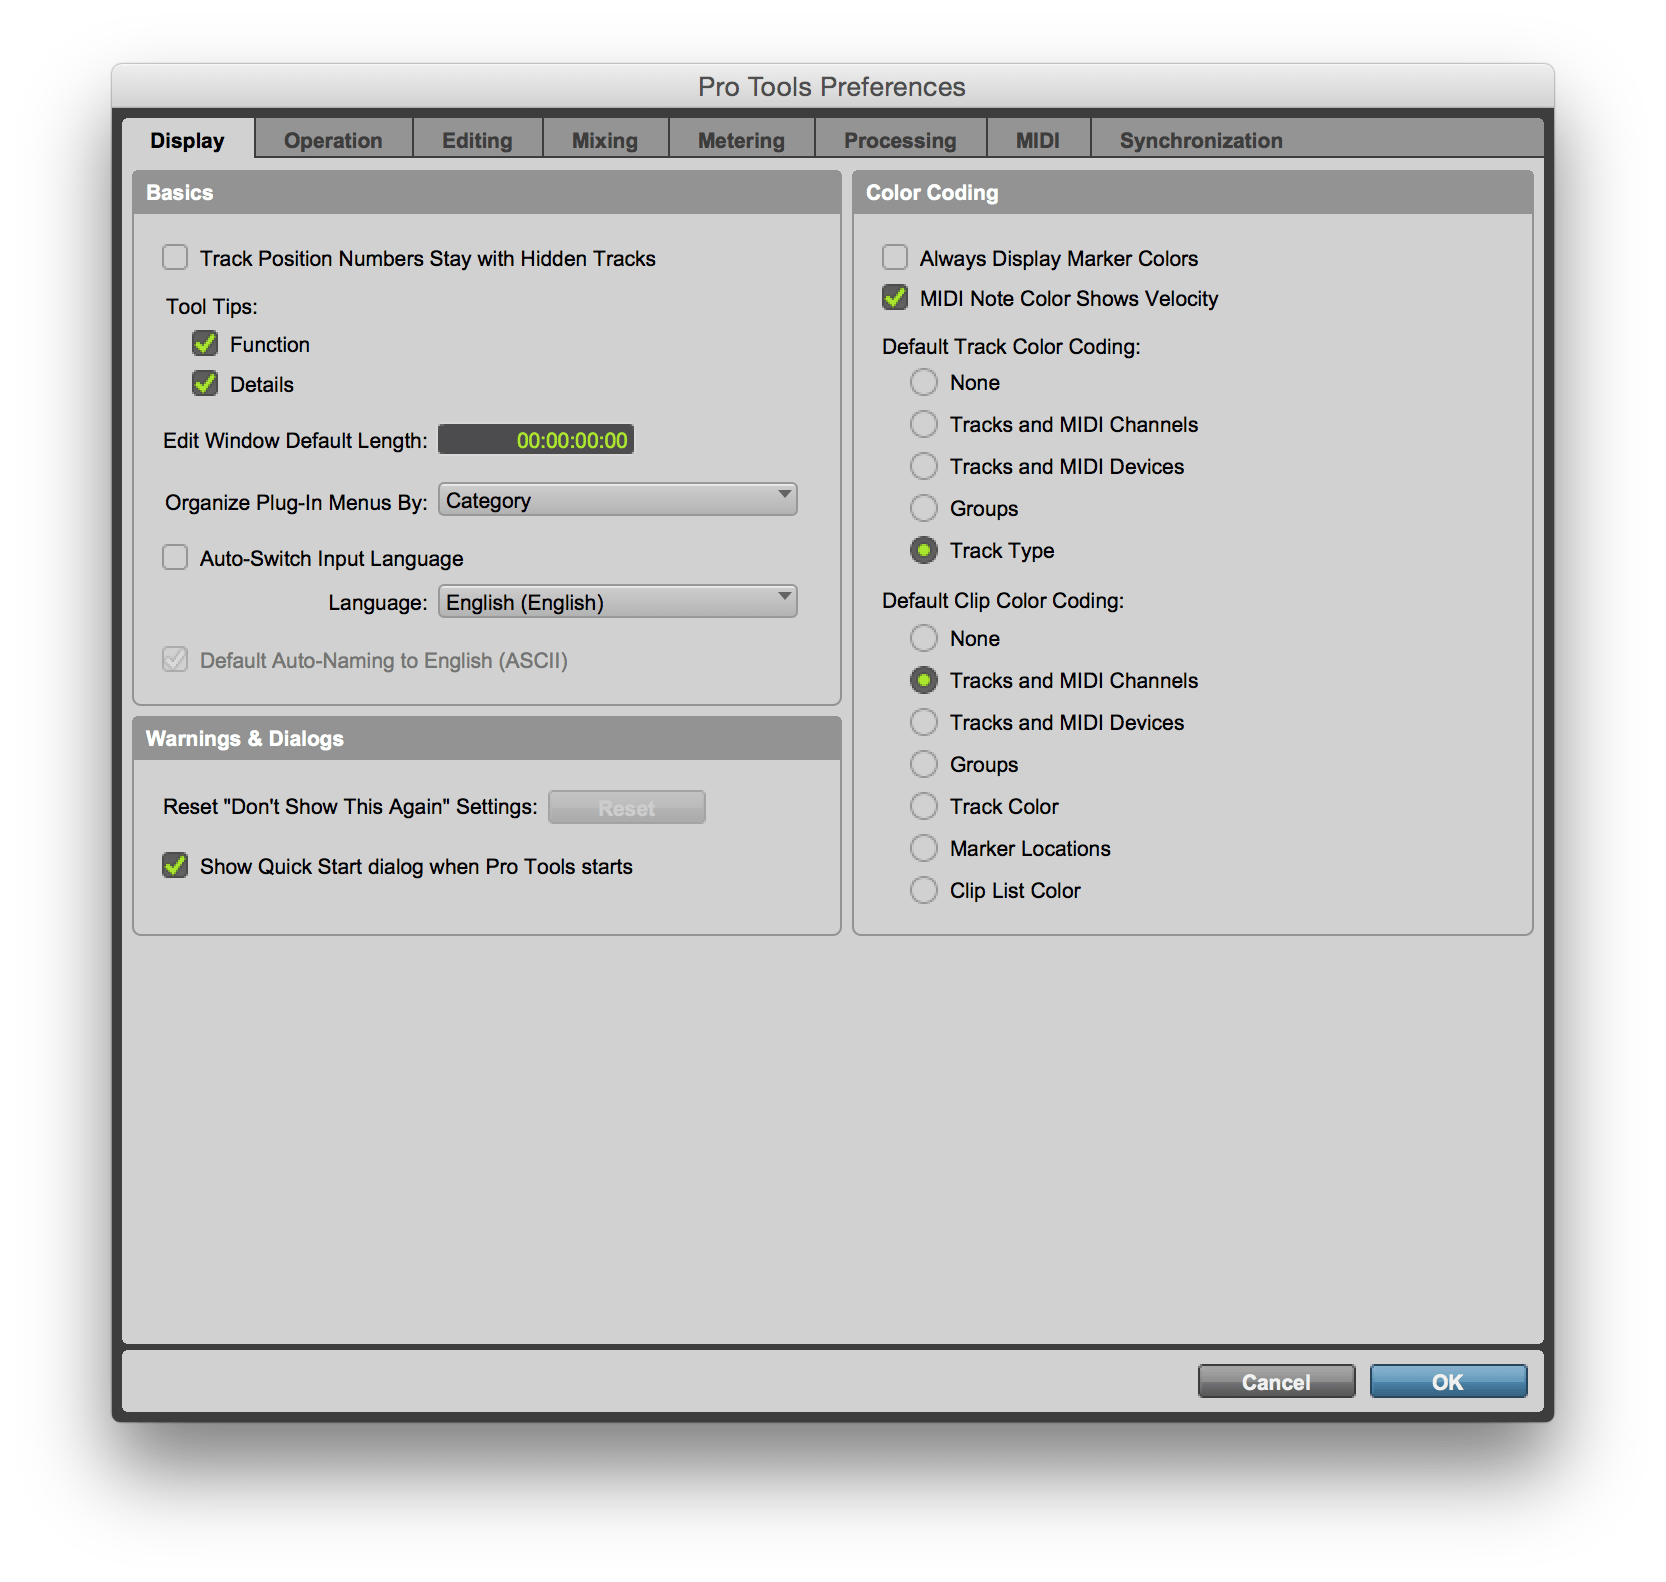
Basics
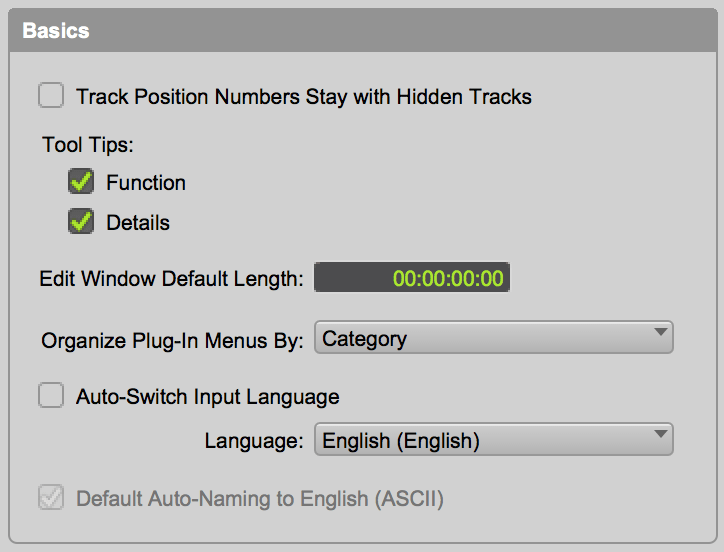
Rail Position Numbers Stay With Subconscious Tracks
When this option is left unchecked numbers are only assigned to tracks that are visible inside your session, these tracks are numbered sequentially while the hidden tracks are left united nations-numbered. Past checking this box, the hidden tracks continue their numbers.
Tool Tips
Brought to us way back in Pro Tools 7, tool tips requite us a more descriptive look at something when we hover our cursor over it, in the grade of a descriptive box.
Function Tool Tip
Checking this configures tool tip to show the basic role of what information technology is your are hovered over.
Details Tool Tip
When 'details' is checked, Pro Tools will show the consummate championship of something that is abbreviated when you hover the cursor over it. This works well for things like runway names, input/output titles and parameters that have been cut curt due to space on screen.
Edit Window Default Length
This option allows you to prepare a default edit window length in hours, minutes, seconds (and frames if you are running Pro Tools HD). The maximum value you can set up is 24 hours, if you really need that much! Equally a rough reference, information technology is commonly best to try and set this to a couple of minutes longer than your total session or song length to ensure y'all can see everything with a little actress space either side just in example.
Organise Plug-In Menus By:
Pretty self explanitory in what this option does, it just allows you to organise your plug-ins by one of the following.
Flat List produces a single long list of everything, this is a scrap messy in my opinion unless you are someone who simply runs very few plug-ins on your organization.
Category will organise your plug-ins into categories such as Dynamics, Filibuster, and EQ, this is option I use in all of my sessions, non that I have hundreds of plug-ins, only when I exercise go hunting, I usually know the kind of effect I'chiliad looking for, so this works as the well-nigh efficient choice for me, each to their own of class!
Manufacturer organises your plug-ins by…..yes you guessed it, the company that created them.
Category and Manufacturer volition organise your plug-ins using a two-level carte. The top menu displays them by category (EQ, Dynamics…), the next menu within this will display the manufacturers.
Machine-Switch Input Language
When left unchecked, any text entered within a session volition be entered in English regardless of the users operating arrangement input language. By checking this box you ensure that the input language is automatically switched from English to whichever language is assail your operating system.
Warnings and Dialogs
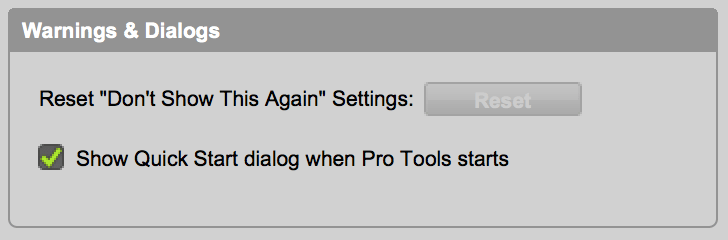
Reset "Don't Testify This Once again" Settings
There may be occasions within Pro Tools where an alert message is displayed, while some of these are useful, some are obvious and you are usually given the choice to cease them displaying each fourth dimension. If you take set a bulletin not to be displayed, yous tin can utilize this button the reset the settings from which you will exist prompted by them once again.
Bear witness Quick Start Dialog When Pro Tools Starts
By default, Pro Tools will show the Quick Start dialog window when Pro Tools starts, if you are someone who tends to piece of work more often on sessions that have already been created or set up, then you may wish for information technology not to, check this box and Pro Tools will open without information technology.
Color Coding
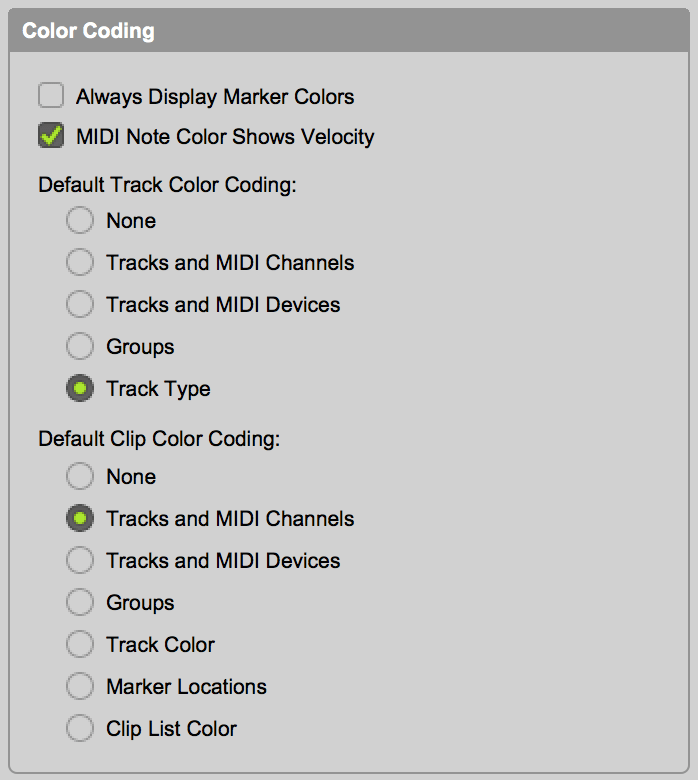
Always Display Marker Colors
When checked this option will allow you to choose marking colours in the markers ruler regardless of what is set in default clip colour coding.
MIDI Annotation Colour Shows Velocity
If y'all are someone who works with virtual instruments and MIDI quite oft like myself, this pick is quite useful. When checked, this option will apply a varied colour shade to a MIDI note based on its velocity, notes with higher velocities will be darker, and lower velocities will show as a lighter colour.
Default Rails Color Coding Options
Larger sessions tin can very much benefit from track colour coding, y'all have the option for case to fix your drums to one colour, and song harmonies to another, just another fashion for you lot to navigate effectually your sessions quicker.
None: This turns off all colour assignments for tracks.
Tracks and MIDI Channels: This option will assign a colour to a rail based on its MIDI channel or voice consignment.
Tracks and MIDI Devices: This option will assign a colour to tracks dependent on its voice or MIDI device assignment.
Groups: Colours are assigned to tracks based on their track grouping id which you can read more than about hither. It is worth noting that if a group is suspended the track colour bars will not be visible.
Rail Type: Colours are assigned based on the kind of track, for case Sound, Video, Master Fader etc.
Default Clip Colour Coding
These options decide the color coding of clips within Pro Tools. Simply similar the track colour coding above, we are offered a range of options. Including the options offered for tracks, there are likewise the following options:
Rail Color: The color of the prune is based off the colour of its track.
Marker Locations: This choice will assign a unique colour to each marker surface area within the marking ruler of a session.
Clip Listing Colour: This choice will assign a color to each clip based on its colour in the prune list.
Final Words
Preferences aren't one of the most exciting things to get involved with when you lot're eager to get on with your productions, but the benefits and time they can save y'all after on are undeniable! Take a little time at present to browse through and brand adjustments, and you lot will quickly notice these little things saving you lot fourth dimension in your sessions.

Source: https://www.protoolsproduction.com/display-preferences/
0 Response to "How To Change Track Color In Pro Tools"
Post a Comment